| �� QUICK RECIPE SUMMARYRecipe Name: Sugar Wax (At-Home Hair Removal)Prep Time: 5 minutesCook Time: 10–15 minutesTotal Time: 20 minutes (+ cooling)Yield: Enough for 2–3 full-leg sessionsDifficulty: Easy (beginner-friendly)Method: Stovetop or microwave |
Ditch the Razor — Here’s a Better Way
Let’s be honest: shaving is a never-ending cycle. You shave today, and by tomorrow you’re prickly again. Waxing at a salon? Expensive, time-consuming, and sometimes awkward. But what if you could get professional-level hair removal at home — using only ingredients already sitting in your kitchen?
That’s exactly what the sugar wax recipe delivers. This ancient hair removal technique, known as sugaring, uses a simple blend of sugar, lemon juice, and water to create a natural wax that pulls hair from the root — leaving you smooth for up to 4–6 weeks. No synthetic chemicals, no harsh resins, and no painful ripping with wax strips.
In this guide, you’ll learn the exact sugar wax recipe that actually works, step-by-step application instructions, pro tips to avoid the most common mistakes, and everything you need to get the best results on your very first try.
Table of Contents
What Is Sugar Wax?
Sugar waxing — or sugaring — is one of the oldest forms of hair removal in the world. It dates back over 4,000 years to ancient Egypt and the Middle East, where women used a natural sugar paste to remove body hair before weddings and royal ceremonies. Cleopatra herself was said to have used a variation of this technique.
Unlike traditional hot wax, which adheres to both hair and skin, sugar wax only bonds to the hair and dead skin cells. This means less irritation, fewer ingrown hairs, and a gentler experience overall — especially for sensitive skin types.
The science is simple: when heated, sugar caramelizes into a thick, pliable paste. Lemon juice acts as a natural preservative and helps break down keratin in hair, while water controls the consistency. When applied to the skin and flicked off in the direction of hair growth (unlike regular wax), it removes hair cleanly from the root.
Sugar Wax vs. Regular Wax: Key Differences
| Feature | Sugar Wax | Regular Wax |
| Ingredients | Natural (sugar, lemon, water) | Synthetic resins, chemicals |
| Skin adhesion | Hair + dead skin only | Hair + live skin |
| Pain level | Lower | Higher |
| Cleanup | Water-soluble | Requires oil/remover |
| Ingrown hairs | Fewer | More common |
| Cost | Pennies per use | $30–$80 per salon session |
Why You’ll Love This Sugar Wax Recipe
- 100% natural ingredients — no harsh chemicals or synthetic fragrances
- Costs under $1 per batch — versus $40–$80 at a salon
- Works on legs, arms, underarms, upper lip, and bikini line
- Less painful than traditional waxing, especially with practice
- Cleanup is effortless — just rinse with warm water
- Suitable for sensitive skin and allergy-prone individuals
- Can be stored for weeks and reheated as needed
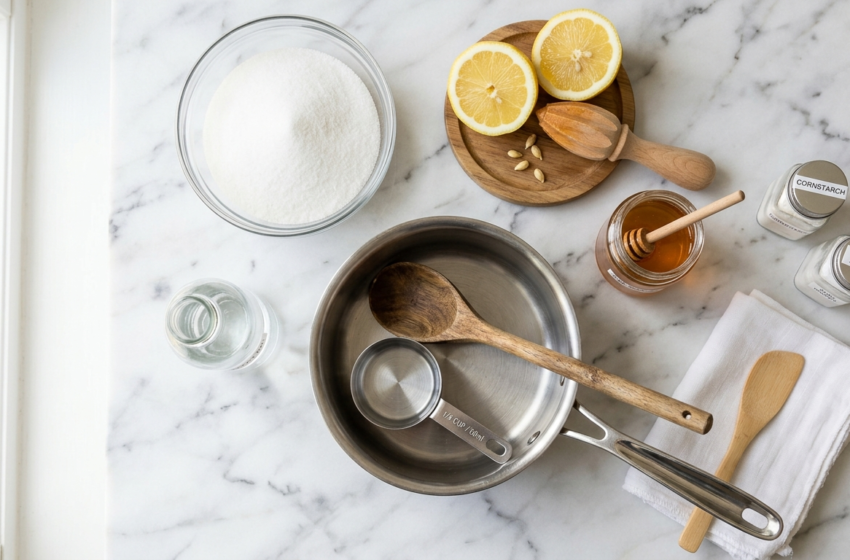
Sugar Wax Ingredients
You only need 3 core ingredients — all of which you probably already have at home. Here’s a complete breakdown with quantities and substitution options:
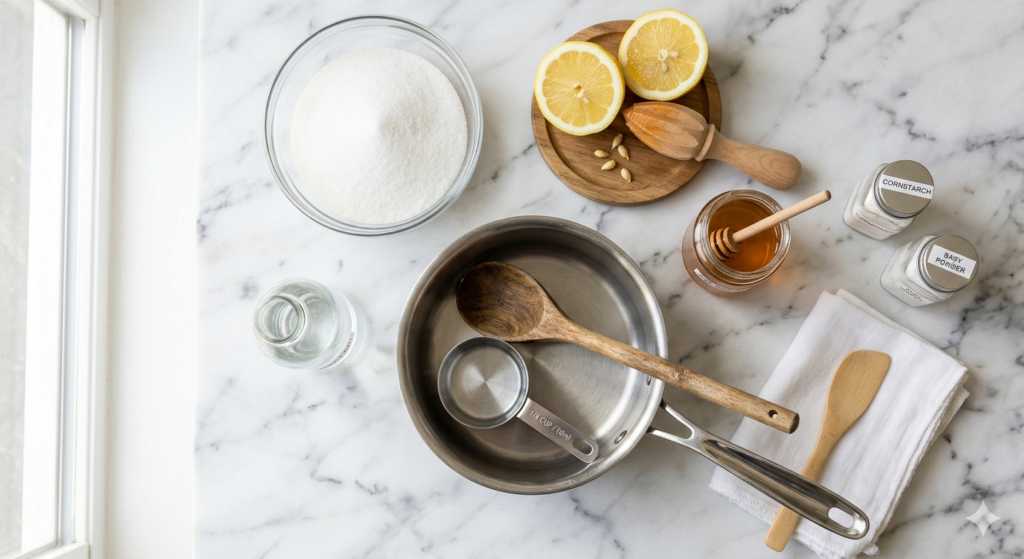
| Ingredient | Amount | Notes / Substitutes |
| White granulated sugar | 2 cups | Raw cane sugar also works |
| Fresh lemon juice | ¼ cup | Bottled lemon juice (less effective) |
| Water | ¼ cup | Filtered water preferred |
| Optional: Lemon zest | 1 tsp | Adds fragrance, optional |
| Optional: Honey | 1 tsp | Helps with consistency for beginners |
Important: Always use white granulated sugar. Brown sugar contains molasses, which alters the consistency and makes the paste harder to work with. Raw cane sugar is a close second if white sugar isn’t available.
How to Make Sugar Wax: Step-by-Step Instructions
What You’ll Need
- Heavy-bottomed saucepan (not non-stick)
- Candy thermometer (highly recommended)
- Wooden spoon or silicone spatula
- Glass jar for storage
- Fabric strips or pre-made waxing strips (or just your hands for the paste method)
Step-by-Step Method
- Combine 2 cups white sugar, ¼ cup lemon juice, and ¼ cup water in a saucepan over medium heat.
- Stir gently until the sugar dissolves — about 2–3 minutes. Do not stir once it starts to bubble.
- Bring the mixture to a gentle boil. Watch carefully — this is where most people go wrong.
- Let it cook without stirring until it reaches 250°F–260°F (121°C–127°C) on a candy thermometer. This is the ‘hard ball’ stage. The color should turn a deep amber-gold.
- Remove from heat immediately and allow it to cool in the pan for 5 minutes.
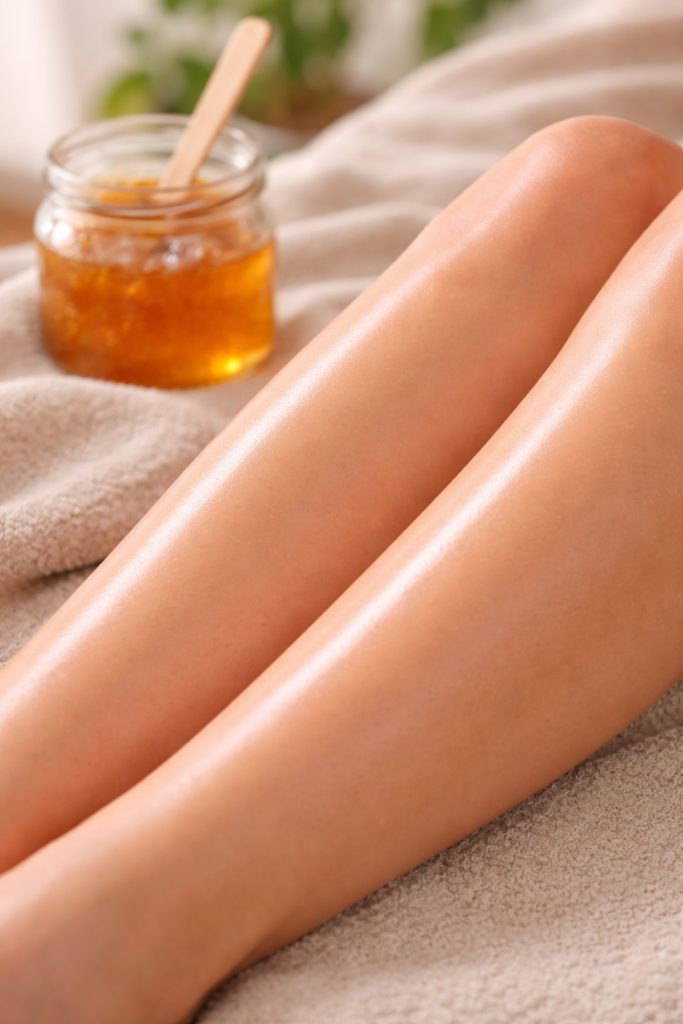
- Transfer carefully to a glass jar. The paste will thicken as it cools.
- Let cool to a comfortable working temperature (roughly 98–104°F / 37–40°C) — warm but not hot to the touch.
- Test a small amount on your inner wrist before applying to larger areas.
Application Method (Paste / No-Strip Method)
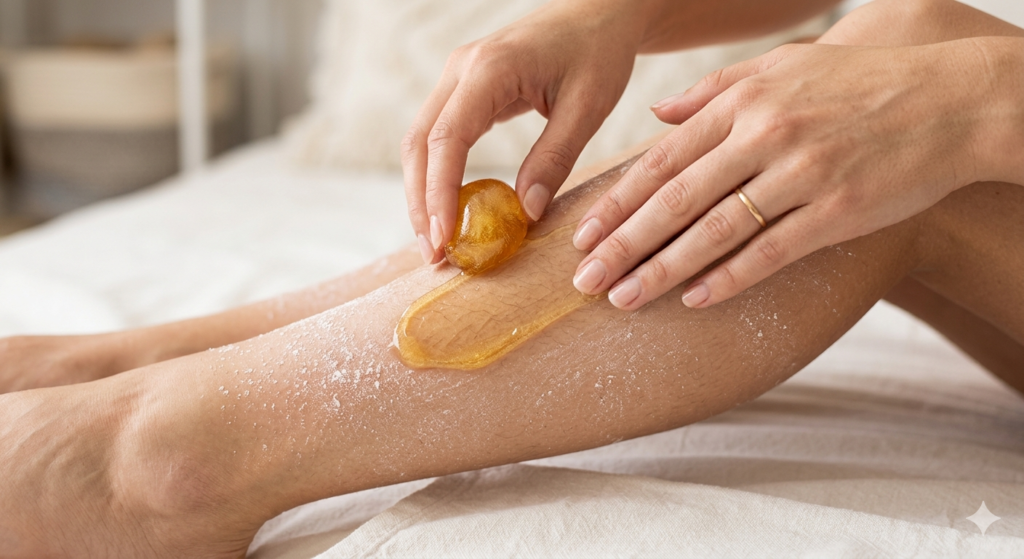
- Dust the skin with cornstarch or baby powder to absorb moisture.
- Scoop a marble-sized ball of sugar paste with your fingers.
- Press firmly against the hair growth direction, spread thin.
- Flick off quickly in the direction of hair growth (opposite to regular wax).
- Reuse the same ball of paste on multiple areas — it doesn’t dry out.
Application Method (Strip Method)
- Apply a thin layer of sugar paste using a popsicle stick in the direction of hair growth.
- Press a fabric strip over the paste and smooth down firmly.
- Pull the strip off quickly in the direction of hair growth.
- Rinse any residue with warm water immediately after.
Pro Tips for the Best Sugar Wax Results
These tips come from years of trial, error, and professional sugaring experience — so you don’t have to learn the hard way:
Getting the Right Consistency
- The paste should look like warm honey — golden, stretchy, and pliable. Too runny means undercooked; too brittle means overcooked.
- If it hardens too much in the jar, microwave in 10-second intervals and stir between each until workable.
- In cold weather, your paste will firm up faster. In hot weather, it may be slightly softer. Adjust cooking time by 30 seconds accordingly.
Skin Prep Tips
- Hair should be at least ¼ inch (6mm) long for best results — about 2–3 weeks of growth after shaving.
- Exfoliate 24 hours before sugaring to lift dead skin cells and reduce ingrown hairs.
- Make sure skin is completely dry. Even a tiny bit of moisture will cause the paste to slide off.
- Avoid applying lotions, oils, or creams on the day of sugaring.
Post-Sugaring Care
- Apply a cool cloth or aloe vera gel immediately after to calm redness.
- Avoid sun exposure, hot showers, or sweaty workouts for 24 hours.
- Moisturize daily and exfoliate 2–3 times per week between sessions to prevent ingrown hairs.
Common Mistakes to Avoid
1. Cooking at Too High a Temperature
This is the #1 mistake. If the mixture exceeds 265°F, the sugar will caramelize too much and become brittle — almost like hard candy. It won’t stretch, won’t grip hair, and will crack when applied. Use a thermometer.
2. Skipping the Cooling Step
Applying sugar wax that’s too hot can cause burns. Always wait until the paste is comfortably warm on your inner wrist before using it. Rushing this step is dangerous and unnecessary.
3. Wet or Oily Skin
Sugar is water-soluble — meaning it will dissolve on contact with moisture. Damp skin will cause the paste to slip and fail to grip the hair. Always dust with powder first.
4. Going Against Hair Growth (Strip Method)
For the strip method, always pull in the direction of hair growth. Pulling against it — like with regular wax — increases pain and breakage. The paste method is even more forgiving since it naturally follows the hair shaft.
5. Not Stretching Skin Taut
Especially on fleshy areas like the inner thigh or underarm, always hold the skin taut with your free hand. This reduces pain significantly and allows for cleaner hair removal.
Sugar Wax Recipe Variations
Classic 3-Ingredient Sugar Wax (Standard)
2 cups sugar + ¼ cup lemon juice + ¼ cup water. The go-to recipe for most skin types and hair textures. Perfect for beginners.
Honey Sugar Wax (For Beginners)
Add 1 teaspoon of raw honey to the standard recipe. Honey adds flexibility to the paste, making it more forgiving and easier to manipulate for first-timers.
Sensitive Skin Sugar Wax
Replace lemon juice with apple cider vinegar and add ½ teaspoon of chamomile extract. This version is gentler on reactive or easily irritated skin.
Sugar Wax with Essential Oils
Add 2–3 drops of lavender or tea tree essential oil after the paste has cooled below 120°F. This adds a calming, antibacterial benefit — great for the bikini area.
Microwave Sugar Wax (Quick Version)
Combine ingredients in a microwave-safe bowl. Microwave on HIGH for 2 minutes, stir, then microwave in 30-second intervals until deep golden. Results are slightly less consistent than stovetop but workable for touch-ups.
Where Can You Use Sugar Wax?
- Legs (most popular area — large batches needed)
- Arms and forearms
- Underarms (especially effective due to hair direction)
- Upper lip and chin
- Eyebrows (use small amounts with precision)
- Bikini line (use caution — skin is sensitive)
- Chest and back (may need assistance)
Note: Avoid sugaring over active acne, broken skin, sunburned areas, varicose veins, or any skin conditions like eczema or psoriasis. Always do a patch test 24 hours before full application.
Storage & Shelf Life
How to Store Sugar Wax
- Transfer to a clean glass jar with an airtight lid.
- Store at room temperature for up to 2 weeks.
- Refrigerate for up to 2 months.
- Do NOT store in plastic containers — the sugar can absorb plasticky odors.
How to Reheat Sugar Wax
- Stovetop: Place sealed jar in hot water for 5–10 minutes, stir.
- Microwave: Microwave with lid off in 10-second bursts, stir between each.
- Never overheat — the paste burns faster the second time around.
Signs that your sugar wax has gone bad: It smells sour or fermented, or has developed mold (rare but possible if water contamination occurred). When in doubt, make a fresh batch — it only takes 20 minutes!
Nutritional Information
Since sugar wax is applied topically and only trace amounts may contact mucous membranes, the nutritional impact is minimal. The following reflects approximate composition per tablespoon of paste:
| Calories (per use) | ~15–25 kcal |
| Total Sugar | ~6g |
| Fat | 0g |
| Protein | 0g |
| Sodium | 0mg |
| Main Ingredient | Sucrose (sugar) |
Sugar wax contains no synthetic dyes, fragrances, resins, or preservatives — making it one of the most skin-safe hair removal options available.
Frequently Asked Questions (FAQs)
1. Is sugar wax better than regular wax?
For most people, yes. Sugar wax is water-soluble (easier to clean up), adheres only to hair and dead skin (less painful), and is free of synthetic chemicals. It’s particularly better for sensitive skin types. The learning curve is slightly higher, but the results are comparable to professional waxing.
2. Why isn’t my sugar wax turning golden? It stays clear.
Clear or pale yellow paste is undercooked. It won’t have the right consistency and will be too sticky to use. Keep cooking over medium heat and watch for that deep amber-gold color before removing from heat. It typically takes 12–15 minutes total.
3. Can I use bottled lemon juice instead of fresh?
Yes, but fresh lemon juice gives better results. Fresh juice has more natural acidity and enzymes that help the paste bond to hair more effectively. Bottled lemon juice contains preservatives that can slightly affect consistency. Use fresh when possible.
4. My sugar wax is too hard after cooling. Can I fix it?
Absolutely. Overcooked or over-cooled paste can be softened. Microwave it in 10-second bursts, stirring between each, until it reaches a warm, pliable consistency. You can also add ½ teaspoon of warm water and stir vigorously to loosen it up.
5. How long does the hair removal last with sugar wax?
With proper technique, sugar waxing results last 3–6 weeks. Over time, with repeated sessions, hair grows back finer and sparser, meaning the results actually improve with each use. This is because sugaring weakens the hair follicle gradually.
6. Can I sugar wax my face?
Yes, but with care. The upper lip, chin, and eyebrow areas are popular spots. Use a small amount of paste and work in very small sections. Avoid the eye area entirely. Always do a patch test first, as facial skin is more delicate than body skin.
7. Is sugar wax safe during pregnancy?
The ingredients are natural and generally considered safe. However, pregnant skin is more sensitive due to hormonal changes, so you may experience more discomfort. Always consult your healthcare provider before trying new beauty treatments during pregnancy. Avoid sugaring over varicose veins or inflamed areas.
8. Why does my sugar wax keep breaking instead of stretching?
This usually means the paste is too cold, too thick, or slightly overcooked. Warm it up gently before use. The ideal working temperature is warm to the touch — like warm taffy. If it snaps when you try to stretch it, reheat slightly.
Conclusion: Your Skin Deserves Better Than a Razor
The sugar wax recipe has been perfected over thousands of years for good reason — it works. Three humble ingredients, twenty minutes of your time, and a small amount of practice is all it takes to achieve salon-quality hair removal at home, for a fraction of the cost.
Whether you’re tired of the endless shaving cycle, sensitive to commercial wax chemicals, or simply looking for a more natural beauty routine, DIY sugaring is one of the most rewarding skills you can add to your self-care arsenal.
Start with the classic 3-ingredient formula, be patient with the cooking process, and don’t get discouraged if your first batch isn’t perfect. By the second or third try, you’ll have the consistency, temperature, and technique dialed in — and silky smooth skin to show for it.
The satisfaction of making things from scratch at home extends far beyond cooking — and if you enjoy the art of DIY homemade recipes, our homemade mayonnaise recipe shows you how to create a fresh, preservative-free condiment in under five minutes using only ingredients you already have in your kitchen. For those interested in natural, time-honored recipes drawn from traditional wisdom, our Talbina recipe is a Prophetic barley porridge that celebrates the enduring power of simple, natural ingredients for nourishment and wellbeing. Explore our full collection of unique homemade recipes at MyRecipesCollections.

Hi, I’m Jamie! I’m a home cook turned recipe developer with a deep love for honest, approachable food. After years of experimenting in my own kitchen — and feeding anyone who’d sit still long enough — I started My Recipes Collections to share the dishes that have become staples at my table.
My recipes focus on bold flavors, simple techniques, and ingredients you can actually find at your local grocery store. Whether you’re a weeknight warrior or a weekend baker, there’s something here for you.