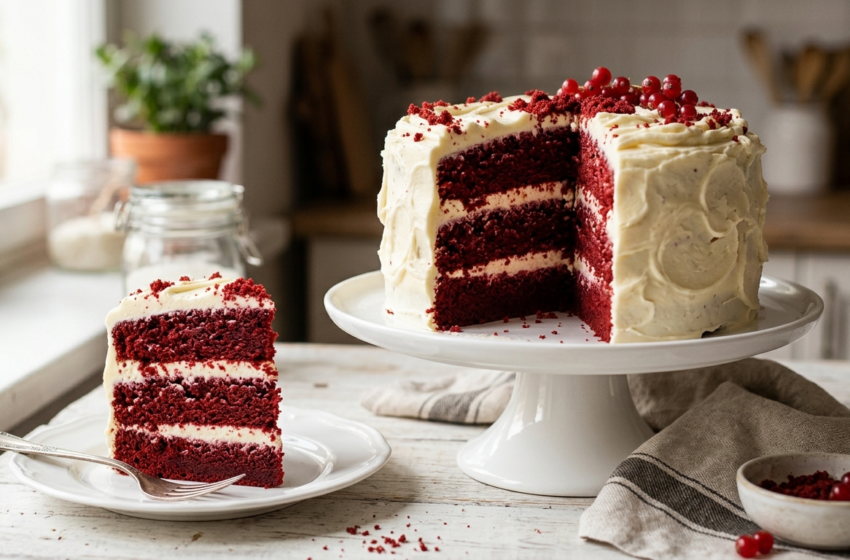
If you’ve been searching for the best red velvet cake recipe moist enough to rival any bakery, your search ends here. This is a completely from-scratch recipe developed, tested, and perfected over dozens of rounds — and it delivers a deep red, velvety crumb with that signature tangy flavor every single time.
Whether you’re baking for Valentine’s Day, Christmas, a birthday, or just because you deserve something spectacular, this guide covers everything.
Table of Contents
Why This Is the Best Red Velvet Cake Recipe You’ll Ever Try
Not all red velvet cakes are created equal. Most recipes you find online produce a flat, dry, or oddly purple cake with no real depth of flavor. This recipe is different and here’s why.
This is the best ever red velvet cake recipe because it combines the perfect ratio of oil to butter, uses cake flour for a finer crumb, and relies on the classic buttermilk-and-vinegar reaction for both rise and tang. The result is a cake that’s impossibly tender, deeply moist, and brilliantly red without tasting like a bottle of food coloring.
We’ve also spent considerable time studying what separates a best Southern red velvet cake recipe from a generic one — and those lessons are baked right into this formula. Add a generous layer of tangy cream cheese frosting and you have a showstopper dessert fit for any occasion, from a casual Sunday dinner to a holiday centerpiece.
⭐⭐⭐⭐⭐ “I’ve made this four times already. My family says it’s the only red velvet cake they’ll eat now.” — Reader Review Placeholder
What Makes a Red Velvet Cake Truly Moist? (Science Explained)
Understanding the science behind moisture is what separates an okay red velvet from a legendary one. Let’s break it down.
The Role of Fat: Oil vs. Butter
Oil is the #1 secret to a super moist red velvet cake. Butter contains roughly 20% water, which evaporates during baking and leaves behind a drier crumb. Vegetable oil or canola oil, by contrast, is 100% fat — meaning every drop stays in your cake. This recipe uses a combination of both: butter for flavor, oil for moisture.
Buttermilk Is Non-Negotiable
Buttermilk is acidic, and that acidity does two critical things. First, it tenderizes the gluten strands in the flour, producing a softer, more delicate crumb. Second, it reacts with the baking soda to create carbon dioxide bubbles that give the cake its lift. Never skip or swap the buttermilk without reading the substitution notes below.
The Vinegar + Baking Soda Reaction
Adding a small amount of white vinegar to the batter amplifies the lift you get from baking soda. This classic baking soda and vinegar reaction produces extra gas bubbles at the last second before baking, creating that light, airy, velvety texture the cake is famous for.
Why Red Velvet Cake Is Red (The Science)
Originally, red velvet cake got its reddish-brown hue from a natural chemical reaction. Anthocyanins — the pigments in natural cocoa powder — react with the acid in buttermilk and vinegar to turn reddish in color. Before the era of artificial coloring, this reaction alone gave the cake its signature tint.
Modern recipes amplify this with red food coloring. You can also use beet powder as a natural coloring alternative — more on that in the tips section. Dutch process cocoa, which is alkalized, does NOT produce this reaction; always use natural (non-Dutch) cocoa powder in red velvet cake.
Cake Flour vs. All-Purpose Flour
Cake flour has lower protein content (about 7–9% vs. 10–12% for all-purpose), which means less gluten development and a more tender crumb. For the most velvety texture, cake flour is the right call. If you only have all-purpose flour, you can substitute by replacing 2 tablespoons per cup with cornstarch — though the result won’t be quite as fine.
Ingredients for the Best Moist Red Velvet Cake From Scratch
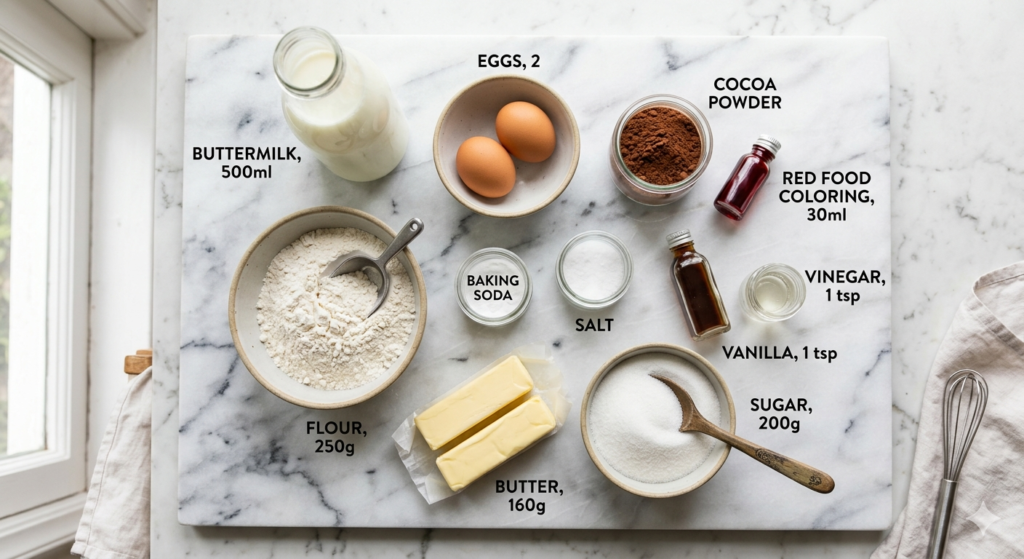
Key Ingredients That Make the Difference
Here’s what you need for two 9-inch round cake layers (or three 8-inch layers):
For the Cake:
- 2½ cups (300g) cake flour — lower protein = more tender crumb
- 2 tablespoons (12g) natural (non-Dutch) unsweetened cocoa powder — essential for color reaction and flavor
- 1 teaspoon baking soda
- 1 teaspoon fine sea salt
- 1½ cups (300g) granulated sugar
- ½ cup (113g) unsalted butter, room temperature — for flavor
- ½ cup (120ml) neutral vegetable oil — for moisture
- 2 large eggs, room temperature — room temperature eggs incorporate more evenly
- 2 teaspoons pure vanilla extract
- 1 cup (240ml) full-fat buttermilk, room temperature — non-negotiable for tang and tenderness
- 2 tablespoons (30ml) red food coloring (liquid or gel; use 1 tbsp gel)
- 1 teaspoon white distilled vinegar — reacts with baking soda for lift
- 1 teaspoon espresso powder (optional, but deepens cocoa flavor without making it taste like coffee)
For the Classic Cream Cheese Frosting:
- 16 oz (454g) full-fat cream cheese, room temperature
- ½ cup (113g) unsalted butter, room temperature
- 4 cups (480g) powdered sugar, sifted
- 2 teaspoons pure vanilla extract
- Pinch of salt
Ingredient Substitutions & Notes
- No buttermilk? Add 1 tablespoon of white vinegar or fresh lemon juice to 1 cup of whole milk. Stir and let sit 5 minutes. Works well, though full-fat buttermilk is still the gold standard. According to King Arthur Baking, the acidity in real buttermilk is more consistent than a homemade substitute.
- Natural food dye: Swap red food coloring for 2–3 tablespoons of beet powder for a natural deep red. The color will be slightly more muted/earthy but completely artificial-dye-free.
- Cake flour substitute: Replace 2 tablespoons per cup of all-purpose flour with cornstarch. So for 2½ cups, use 2¼ cups all-purpose flour + 5 tablespoons cornstarch.
- Room temperature matters. Cold butter won’t cream properly. Cold eggs can cause the batter to curdle. Pull everything from the fridge 60–90 minutes before baking.
Best Red Velvet Cake Recipe – Step-by-Step Instructions
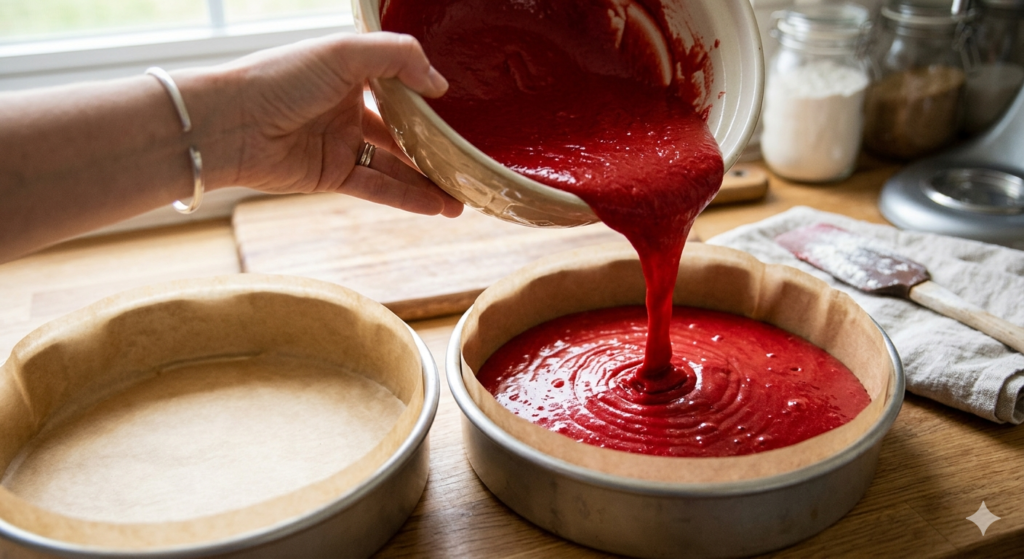
Preparing Your Pans & Oven
- Preheat your oven to 350°F (175°C). Rack in the center position.
- Grease two 9-inch round cake pans (or three 8-inch pans) with butter or baking spray.
- Line the bottoms with parchment paper circles, then grease the parchment. This is the single most reliable way to ensure your layers release cleanly. [INTERNAL LINK: How to Line Cake Pans Perfectly]
- Lightly dust the sides with flour (or cocoa powder to avoid white streaks on the sides).
Making the Batter (The Right Way)
- Whisk the dry ingredients. In a medium bowl, whisk together the cake flour, cocoa powder, baking soda, and salt. Set aside.
- Cream butter and sugar. In a large bowl using a stand mixer fitted with the paddle attachment (or a hand mixer), beat the room temperature butter and sugar on medium-high speed for 4–5 full minutes until pale and fluffy. This step is critical — don’t rush it. Proper creaming incorporates air that gives the cake structure.
- Add oil gradually. With the mixer on low, stream in the vegetable oil. Beat until combined.
- Add eggs one at a time. Add each egg at medium speed, mixing for 30 seconds between additions. Scrape down the bowl.
- Add vanilla and red food coloring. Mix in the vanilla extract and red food coloring (or beet powder paste) until fully incorporated.
- Alternate dry and wet ingredients. With the mixer on low, add the dry flour mixture in three additions, alternating with buttermilk in two additions. Begin and end with the flour mixture. Do not overmix — stop as soon as the last streaks of flour disappear.
- Add vinegar last. Stir in the white vinegar by hand with a rubber spatula. The batter will look very bright red and slightly bubbly — that’s exactly right.
Baking to Perfection
- Divide the batter evenly between your prepared pans. Use a kitchen scale for perfectly even layers (each pan should weigh approximately the same).
- Bake at 350°F for 28–33 minutes. Start checking at the 28-minute mark. The cake is done when:
- A toothpick inserted in the center comes out with just a few moist crumbs (not wet batter)
- The edges have pulled slightly away from the pan
- The top springs back when lightly pressed
- Do not overbake. Even 3–4 extra minutes can dry out a red velvet cake significantly. Err on the side of slightly underdone — carryover heat will finish the job.
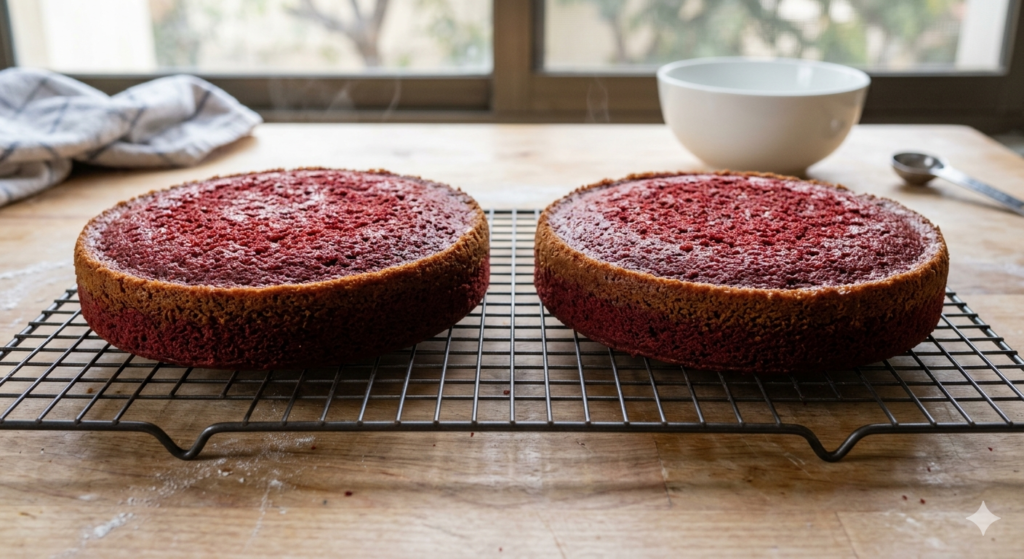
Cooling & Frosting Tips
- Cool in pans for exactly 10 minutes on a wire rack. No more, no less. Too short and the cake may break; too long and it may stick.
- Run a thin knife or offset spatula around the edge before inverting onto the rack.
- Cool layers completely — at least 1 hour at room temperature, or 30 minutes in the fridge. Frosting a warm cake will melt the cream cheese frosting and cause layers to slide.
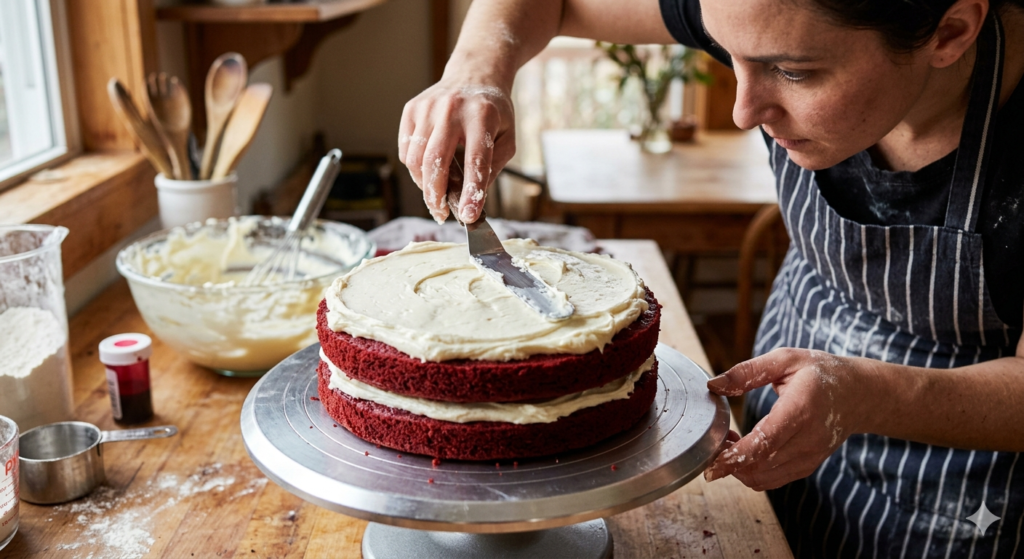
- Level your layers. Use a long serrated knife to trim any domed tops before assembling. Save the trimmings for decorating or snacking.
The Classic Cream Cheese Frosting Recipe (Best Pairing)
Red velvet cake and cream cheese frosting are one of the great partnerships in baking. The tangy, rich cream cheese perfectly offsets the cake’s subtle cocoa notes and deep sweetness. Here’s how to make a frosting that pipes, spreads, and holds its shape like a professional.
Instructions:
- Beat the room temperature cream cheese and butter together on medium-high speed for 3–4 minutes until completely smooth and fluffy. There should be zero lumps.
- Reduce speed to low and add sifted powdered sugar one cup at a time, mixing between each addition.
- Add vanilla and a pinch of salt. Increase to medium-high and beat for 2 more minutes.
- If frosting is too soft to pipe, refrigerate for 20–30 minutes.
Frosting Consistency Tips:
- For a thicker, piping-ready frosting, add an extra ½ cup of powdered sugar.
- For a looser drizzle glaze (perfect for the bundt version), thin with 1–2 tablespoons of heavy cream.
- For a less sweet frosting, reduce sugar and add 1 tablespoon of sour cream.
Other Frosting Options:
- Ermine (Flour-based) Frosting: The historically “correct” frosting for classic Southern red velvet. Less sweet, silkier texture.
- Whipped Cream Cheese Frosting: Fold in ½ cup of stabilized whipped cream for a lighter result.
- Vanilla Buttercream: Works well for those who prefer a less tangy topping.
Best Southern Red Velvet Cake Recipe Variation

The best Southern red velvet cake recipe has roots that go deep into American culinary history. Long before the Waldorf Astoria in New York claimed it in the 1950s, Southern bakers were making red velvet-style cakes using the natural chemical reaction between cocoa and acid. The Waldorf Astoria myth — that the hotel invented the recipe and then charged a woman for it, prompting her to share it freely — is likely apocryphal, but it remains one of baking’s favorite legends.
What Makes the Southern Version Different?
- Ermine frosting (boiled milk frosting) instead of cream cheese. This was the original topping — silky, less sweet, and made with a roux of flour and milk.
- Less food coloring and more reliance on the natural cocoa-acid reaction for color.
- Pecans in or on the cake — chopped and folded into the batter or pressed into the sides of the frosted cake.
- Three layers rather than two, with generous frosting between each.
- A slightly denser crumb due to the use of all-purpose flour rather than cake flour.
Southern Red Velvet Variation Adjustments:
- Replace cake flour with all-purpose flour (same quantity).
- Reduce red food coloring to 1 tablespoon.
- Top with Ermine frosting (see recipe below) instead of cream cheese.
- Fold ½ cup chopped toasted pecans into the batter.
Quick Ermine Frosting:
- Cook 5 tablespoons flour + 1 cup whole milk over medium heat, whisking constantly, until thick as pudding. Cool completely.
- Beat 1 cup (2 sticks) softened butter + 1 cup sugar until fluffy, 5 minutes.
- Add cooled flour paste 1 tablespoon at a time, beating well. Add 1 tsp vanilla.
According to food historian and author Adrian Miller, red velvet cake became a staple of the African American culinary tradition and holds deep cultural significance in Southern cooking. [External: Southern Foodways Alliance]
Best Moist Red Velvet Bundt Cake Recipe
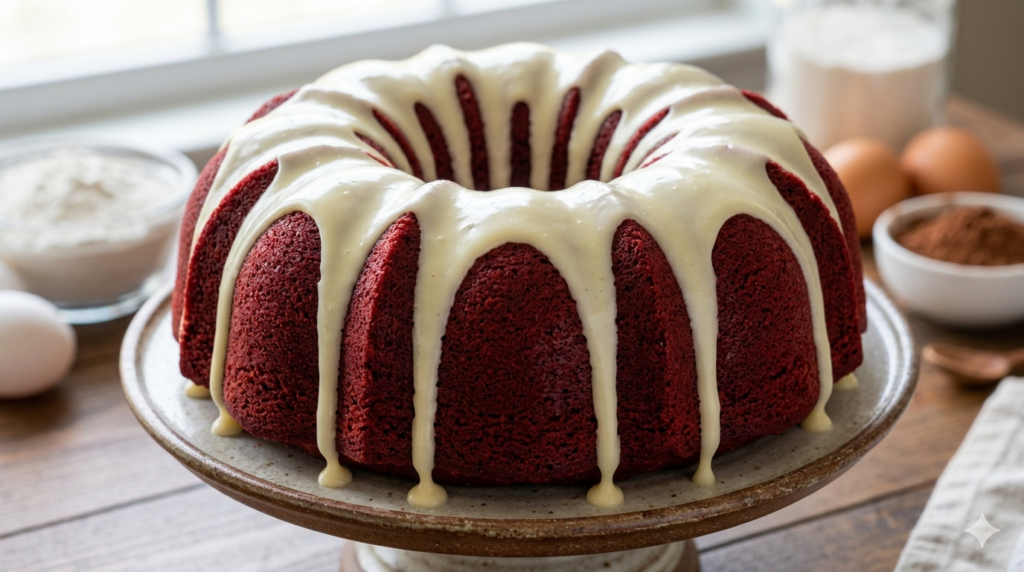
A red velvet bundt cake is the easiest way to make an impressive centerpiece with minimal assembly. No layers to level, no crumb coat, no stacking — just a beautifully shaped cake with a dramatic cream cheese drizzle.
Bundt Pan Tips (Critical):
- Grease every groove meticulously. Use a pastry brush to coat the entire interior of the bundt pan with softened butter, then dust with flour. Missing a single crevice means a broken cake.
- Do not fill more than ⅔ full. The batter rises significantly. A standard 10–12 cup bundt pan is ideal for this full recipe.
- Bake at 325°F (not 350°F) for 50–60 minutes. The lower temperature ensures the inside bakes through without the outside over-browning.
- Cool in the pan for 15 minutes before inverting — not 10. The slightly longer rest helps the structure set.
Bundt Variation Adjustments:
- Reduce baking soda to ¾ teaspoon (less rise needed in a single-layer format).
- Add 1 tablespoon sour cream to the batter for extra moisture and tangy depth.
- Top with a cream cheese drizzle rather than full frosting: thin the cream cheese frosting with 2–3 tablespoons heavy cream until pourable.
Best Red Velvet Pound Cake Recipe
The best red velvet pound cake recipe transforms this classic layer cake into a dense, rich loaf format — perfect for slicing and gifting. Think of it as the red velvet cake’s more dignified, less fussy cousin.
Pound cakes use a higher butter-to-flour ratio and no baking soda (or very little), resulting in a tight, dense crumb that slices cleanly and stays moist for days.
Red Velvet Pound Cake Adjustments:
- Use 1 cup (2 sticks) butter and no vegetable oil.
- Reduce baking soda to ½ teaspoon.
- Add 8 oz cream cheese directly to the batter for richness and tang.
- Use a 9×5-inch loaf pan or a 10-cup tube pan.
- Bake at 325°F for 70–80 minutes, or until a toothpick comes out clean.
- Cool completely before slicing — pound cakes slice much better the next day.
Best Gluten-Free Red Velvet Cake Recipe
Good news: red velvet cake adapts beautifully to gluten-free baking — better than most cakes, in fact. The buttermilk and oil keep moisture high even with alternative flour blends.
The Science of Gluten-Free Adaption
Standard cake flour provides both structure and tenderness through its gluten network. When you remove gluten, you need two things to compensate:
- A quality 1:1 gluten-free flour blend (one that already contains xanthan gum, such as Bob’s Red Mill 1-to-1 or King Arthur Measure for Measure).
- Xanthan gum as a binding agent — if your blend doesn’t already include it, add ½ teaspoon per cup of flour. King Arthur Baking’s Guide to Gluten-Free Flour is an excellent resource on the subject.
Gluten-Free Variation Adjustments:
- Swap cake flour 1:1 with a gluten-free 1-to-1 baking flour blend with xanthan gum.
- Add 1 teaspoon apple cider vinegar (in addition to the white vinegar) for extra lift.
- Rest the batter for 10 minutes before baking. GF flours absorb liquid more slowly; resting lets the starches hydrate.
- Bake at 325°F for 32–38 minutes — GF cakes can brown faster on the outside.
- Do not underbake. GF cakes can appear done but be gummy in the center. Use both the toothpick test and the spring-back test.
Note on Oats: This recipe is inherently oat-free. If you’re baking for someone with celiac disease, verify all ingredients (including cocoa powder and vanilla) are certified gluten-free.
Pro Tips for the Best Super Moist Red Velvet Cake Every Time
These are the details that separate a best super moist red velvet cake from a merely good one. Every professional baker lives by these.
- Use a kitchen scale. Volume measurements (cups) can be off by 20% depending on how you scoop. Weight is always precise.
- Do not skip the espresso powder. Even ½ teaspoon deepens the cocoa flavor without making the cake taste like coffee.
- Use gel food coloring. Gel is more concentrated than liquid, so you need less and it doesn’t thin the batter. 1 tablespoon of gel = roughly 2 tablespoons of liquid coloring.
- Natural alternative: beet powder. Use 2–3 tablespoons dissolved in 1 tablespoon warm water. The color is less vivid but 100% natural and still beautiful. Sally’s Baking Addiction has a thorough comparison of natural vs. artificial coloring options.
- Never open the oven before 25 minutes. Early oven opening causes the center to sink.
- Rotate pans at the halfway point for even baking.
- High altitude adjustment (above 3,500 ft): Reduce baking soda by ¼ teaspoon, reduce sugar by 2 tablespoons, increase buttermilk by 2 tablespoons, and increase oven temperature by 15–25°F. Cakes at altitude need slightly more structure and less leavening.
- For the reddest crumb possible: Use a bright red gel food coloring (like AmeriColor Super Red or Wilton No-Taste Red), add it before the buttermilk, and mix on low to prevent air from dulling the color.
- Brush cooled layers with simple syrup (equal parts sugar and water, heated and cooled) for an extra moisture insurance policy — a trick from professional cake decorators.
Common Red Velvet Cake Mistakes (And How to Fix Them)
1. Cake Turned Out Brown, Not Red
Cause: Used Dutch process cocoa instead of natural cocoa. Dutch process is alkalized and won’t react with the acid in buttermilk. Fix: Always use natural (non-Dutch) unsweetened cocoa powder.
2. Cake Is Dry and Dense
Cause: Overbaked, too much flour, or cold ingredients. Fix: Use a scale. Pull from the oven when toothpick has moist crumbs (not wet, not clean-clean). Use room temperature butter, eggs, and buttermilk.
3. Cake Sank in the Middle
Cause: Underbaked, or oven door was opened too early. Fix: Don’t open the oven before 25 minutes. Check doneness with both a toothpick and a spring-back test.
4. Batter Curdled When Adding Eggs
Cause: Cold eggs added to creamed butter. Fix: Always use room temperature eggs. If you forgot, place eggs in a bowl of warm water for 10 minutes before using.
5. Frosting Is Too Runny
Cause: Cream cheese was too warm, or butter was too soft. Fix: Refrigerate the frosting for 20–30 minutes. If still too loose, add powdered sugar ¼ cup at a time.
6. Cake Stuck to Pan
Cause: Insufficient greasing, or didn’t use parchment. Fix: Always use parchment rounds AND grease the sides. For bundt pans, use a pastry brush for complete coverage.
7. Layers Are Uneven in Height
Cause: Unequal batter distribution. Fix: Weigh batter into pans on a kitchen scale.
8. Cake Tastes Bitter
Cause: Too much baking soda, or baking soda wasn’t fully reacted. Fix: Make sure you’re adding the vinegar (it activates the soda). Don’t increase baking soda beyond 1 teaspoon.
9. Cake Color Faded After Baking
Cause: Heat breaks down artificial dyes; or used too little coloring. Fix: Use gel coloring (more stable than liquid in heat). Add a touch more than you think you need.
10. Frosting Pulled Off Crumbs
Cause: Frosting warm layers, or skipped a crumb coat. Fix: Always frost completely cool layers. Apply a thin crumb coat, refrigerate 20 minutes, then apply the final layer.
How to Store, Freeze & Make Ahead

Room Temperature:
Unfrosted cake layers can sit at room temperature (wrapped tightly in plastic wrap) for up to 2 days.
Frosted cake with cream cheese frosting must be refrigerated due to the dairy content. Keep in an airtight cake dome or wrap the cut edges with plastic wrap. Stays fresh for up to 5 days.
Refrigerator Tips:
Cold temperatures can make cake seem drier than it is. Always let refrigerated cake sit at room temperature for 30–45 minutes before serving.
Freezing:
Red velvet cake freezes beautifully — both frosted and unfrosted.
- Unfrosted layers: Wrap each layer tightly in two layers of plastic wrap, then foil. Freeze for up to 3 months.
- Frosted cake (whole or sliced): Freeze slices on a baking sheet until solid, then wrap individually in plastic + foil or place in airtight containers. Freeze for up to 2 months.
- Thaw: Overnight in the refrigerator, then 30–60 minutes at room temperature.
Make-Ahead Timeline (Up to 3 Days Ahead):
- 3 days ahead: Bake and cool cake layers. Wrap tightly and refrigerate.
- 2 days ahead: Make cream cheese frosting. Refrigerate in an airtight container.
- Day of: Let frosting come to room temp 30 minutes, re-whip briefly, then assemble and frost.
This make-ahead strategy is a lifesaver for holiday baking and special occasions.
Red velvet is not the only cocoa-based showstopper in our collection — our chocolate pound cake recipe delivers an equally dense, rich crumb using Dutch-process cocoa and a classic creaming method that keeps every slice perfectly moist for days. For finishing touches and decoration inspiration, our complete guide to cheesecake toppings covers over 25 topping ideas — from fresh fruit glazes to caramel drizzles — that work just as beautifully on this red velvet cake. Find these recipes and many more at MyRecipesCollections, your go-to resource for easy, tested bakes.
Why is my red velvet cake not moist?
The most common cause is overbaking or using cold ingredients. Bake until a toothpick comes out with just a few moist crumbs, not clean. Cold butter won’t cream properly, and cold eggs can cause the batter to break. Make sure everything is at room temperature before you begin. Also, check that you used oil in addition to butter — skipping oil is a major moisture mistake.
What makes red velvet cake red?
Historically, the red color came from a natural chemical reaction: anthocyanins (the pigments in natural cocoa powder) react with the acidic buttermilk and vinegar, producing a reddish tint. Modern recipes amplify this with liquid or gel red food coloring. You can also use beet powder as a natural alternative — it produces a deep, earthy red without artificial dyes. The type of cocoa matters enormously: you must use natural, non-alkalized cocoa powder, not Dutch process.
How many layers should red velvet cake have?
The classic presentation is 2 or 3 layers of 8- or 9-inch rounds. A two-layer cake is impressive and easier to stack; a three-layer cake is more dramatic and impressive for celebrations. For a 6-inch cake, you can make 4 thin layers from the same batter. The Southern tradition typically favors 3 thin layers with generous frosting between each.
What is the difference between red velvet and chocolate cake?
This is one of the most commonly asked questions! While both cakes contain cocoa powder, they are quite different. Red velvet cake uses only a small amount of cocoa (2 tablespoons), relies heavily on buttermilk and vinegar for its signature tangy flavor, and gets its color from a chemical reaction plus food coloring. Chocolate cake uses a large amount of cocoa or melted chocolate, has a pronounced chocolate flavor, and no vinegar. The texture is different too: red velvet aims for a fine, velvety crumb, while chocolate cake can range from dense fudgy to light and fluffy. Red velvet’s flavor profile is subtle, tangy, and only faintly chocolatey — that’s what makes it distinctive.
Related Posts:
25 Healthy Cinnamon Rolls Recipes (No Sugar, Low Carb & High Protein) — 2026 Guide
Best Cheesecake Toppings: 25+ Ideas from Simple to Gourmet (Complete Guide)

Hi, I’m Jamie! I’m a home cook turned recipe developer with a deep love for honest, approachable food. After years of experimenting in my own kitchen — and feeding anyone who’d sit still long enough — I started My Recipes Collections to share the dishes that have become staples at my table.
My recipes focus on bold flavors, simple techniques, and ingredients you can actually find at your local grocery store. Whether you’re a weeknight warrior or a weekend baker, there’s something here for you.